If you have any problems during setup, our experts will be happy to provide you with Mikrotik Setup SERVICE!
So, let’s get started! Configuring Mikrotik Vlan.
This setting is relevant only for wifi-qcom / wifi-qcom-ac wireless drivers and RouterOS firmware version higher than 7.0!
If your Mikrotik hardware uses the Wireless driver for wireless modules and it is not possible to replace it due to incompatibility, this article will not be suitable for implementing a Mikrotik Guest Network via Vlan! This incompatibility can be found on the official Mikrotik website!
1) Initial conditions and preparations for setting up Guest Network via Vlan Mikrotik 7.0 and higher.
Why: to make sure that the hardware/software is suitable and will work correctly.
WinBox/WebFig: go to System → Packages, check:
routeros 7.13+ (or newer), wifi-qcom / wifi-qcom-ac,

- If you see the wireless package, you need to uninstall it, using the button above (Unistall), reboot the router, and then add the corresponding wifi-qcom / wifi-qcom-ac package to Files according to the RouterOS firmware installed at the time of configuration and reboot again, after the reboot should appear already updated WiFI modules working on the new driver.
- Model: hAP ax² / hAP ac² etc. support wifi-qcom / wifi-qcom-ac packages respectively!
Plan, Configuring Mikrotik Vlan:
In our scheme, 3 Vlan will be used:
- Vlan10 – Primary network.
- Vlan20 – Guest Network.
- Vlan30 – The management network, the management network is also called.
Network plan: determine which port goes to the aplink/internet (e.g. ether1) and which ports go to the switch/AP (e.g. ether2, ether3).
2) Creating VLAN interfaces (on the bridge)
Why: To bring up logical interfaces for each VLAN.
- WinBox: Interfaces → VLAN → +:
Name: VLAN10_VIP, VLAN ID: 10, Interface: BridgeLocal → OK,

Name: VLAN20_GUEST, VLAN ID: 20, Interface: BridgeLocal → OK,
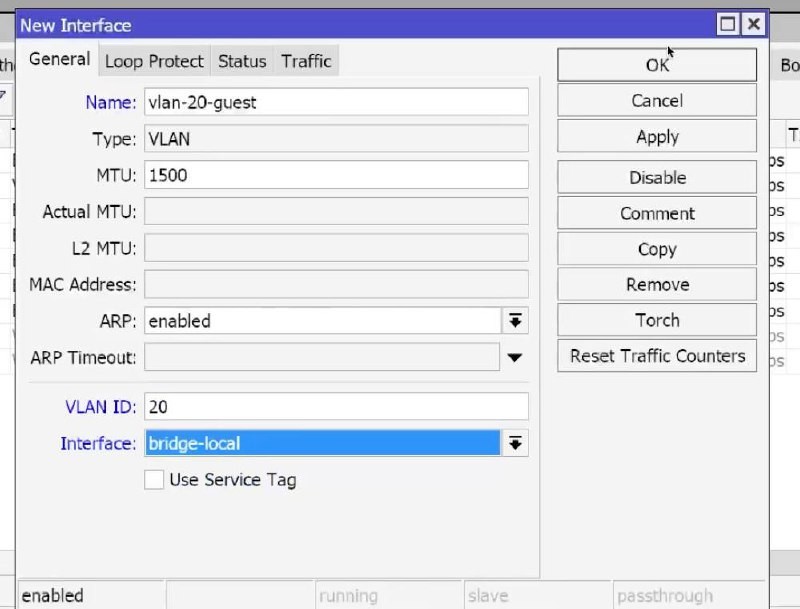
And 30 Vlan is created in the same way as the 2 previous ones by analogy.
Create a VLAN on the BridgeLocal, not on the port – this is recommended in ROS7.
On the command line, it will look like this(CLI):
/interface vlan
add name=VLAN10_VIP vlan-id=10 interface=BridgeLocal
add name=VLAN20_GUEST vlan-id=20 interface=BridgeLocal
add name=VLAN33_MGMT vlan-id=33 interface=BridgeLocal
Result: 3 VLANs appear in the interface list.
3) Assign IP addresses to VLAN
Why: gateway/management for each subnet.
WinBox: IP → Addresses → +:
172.16.10.1/24 → Interface: VLAN10_VIP → OK,
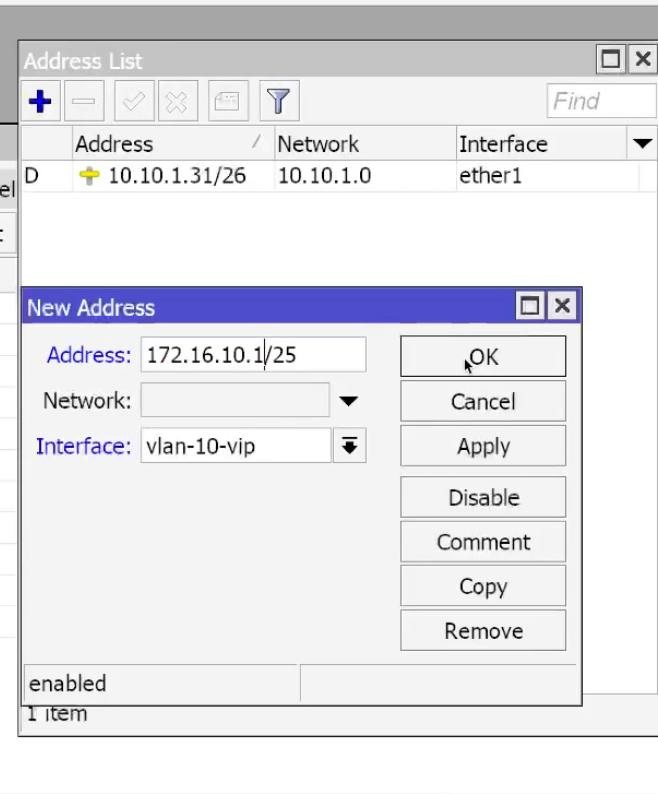
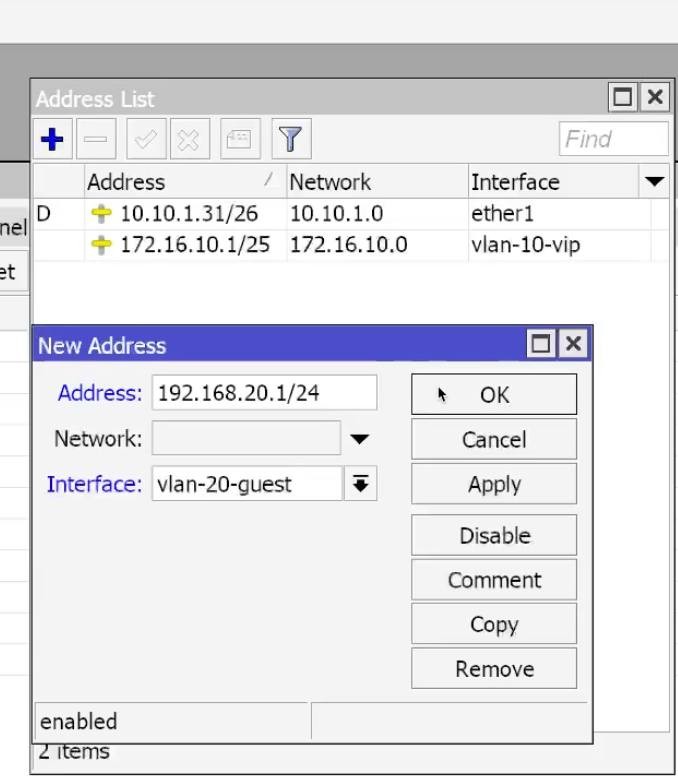
192.168.20.1/24 → Interface: VLAN20_GUEST → OK,
192.168.30.1/24 → Interface: VLAN30_MGMT → OK. Similar to the previous two.
CLI:
/ip address
add address=172.16.10.1/24 interface=VLAN10_VIP
add address=192.168.20.1/24 interface=VLAN20_GUEST
add address=10.30.30.30.1/24 interface=VLAN30_MGMT
Result: three addresses in the IP → Addresses list.
4) Bridge VLANs table (Bridge VLANs). Configuring Mikrotik Vlan
Why: to determine which VLANs pass through which ports (tagged/untagged).
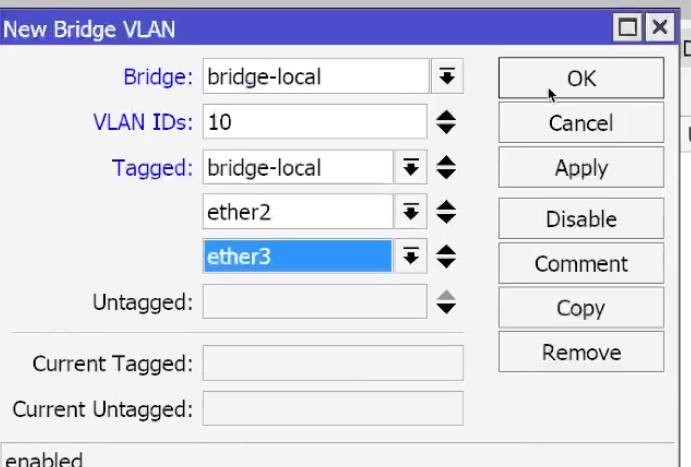
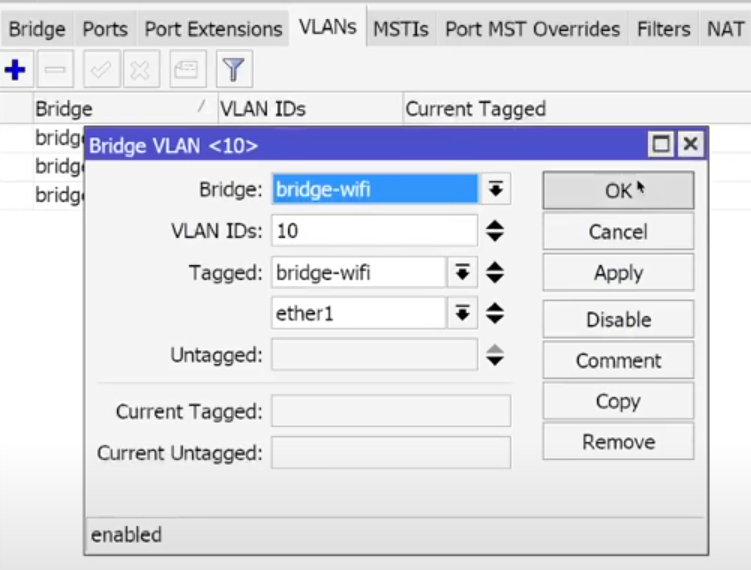
- WinBox: Bridge → VLANs → +:
- VLAN 10:
- VLAN IDs: 10,
- Tagged: BridgeLocal, ether2, ether3,
- Untagged: (leave blank) → OK.
- VLAN 10:
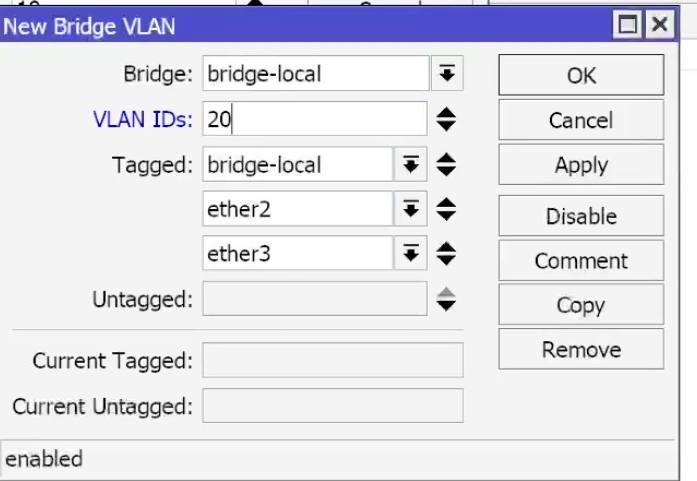
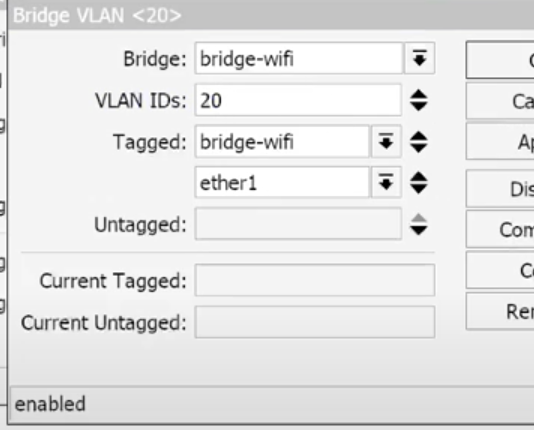
For VLAN 20:
For Vlan30, similar to the previous two.
This makes ether2/ether3 trunk ports (tagged only). If you need an access port on a VLAN, add it to Untagged and set the corresponding PVID in Bridge → Ports.
CLI:
/interface bridge vlan
add bridge=BridgeLocal vlan-ids=10 tagged=BridgeLocal,ether2,ether3
add bridge=BridgeLocal vlan-ids=20 tagged=BridgeLocal,ether2,ether3
add bridge=BridgeLocal vlan-ids=30 tagged=BridgeLocal,ether2,ether3
- Result: three rules in Bridge VLANs.
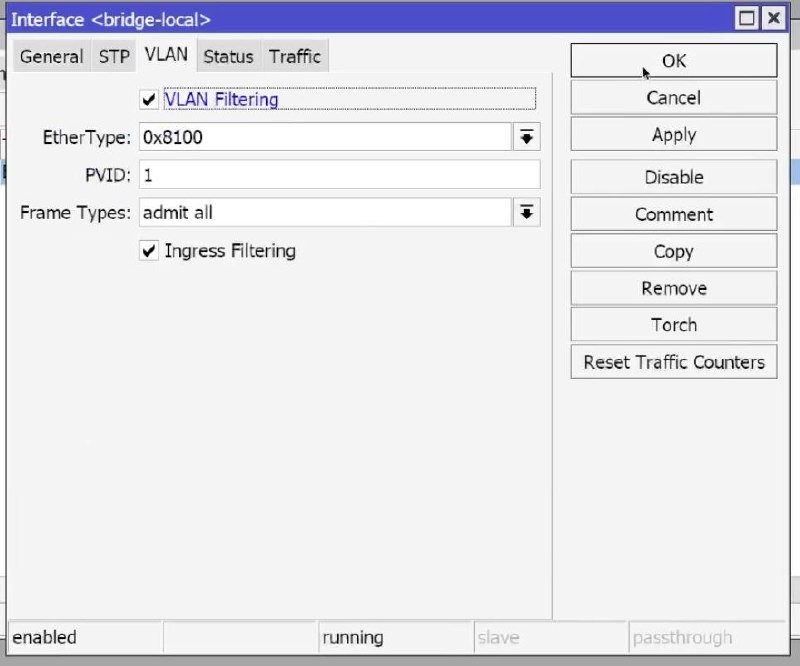
5) Enabling VLAN Filtering (and ingress)
Why: you need to enable hardware VLAN filtering in the bridge otherwise subnet traffic will not pass through.
- WinBox: Bridge → Bridge (double click on BridgeLocal) → VLAN tab:
- Enable (check the box) VLAN Filtering,
- Enable Ingress Filtering → OK.
CLI:
/interface bridge set BridgeLocal vlan-filtering=yes ingress-filtering=yes
Result: in the bridge list VLAN Filtering: yes.
6) Checking the Mikrotik bridge ports
Why: make sure that ports are added to the bridge and have the expected state.
- WinBox: Bridge → Ports:
- Make sure ether2, ether3 are in BridgeLocal.For trunk, leave PVID=1 (default).
- For the access port (if needed):
- Set PVID = <VLAN ID> and add the port to Untagged in the corresponding Bridge → VLANs rule.
CLI (view):
/interface bridge port print
Result: desired ports are in the bridge, PVIDs are configured.
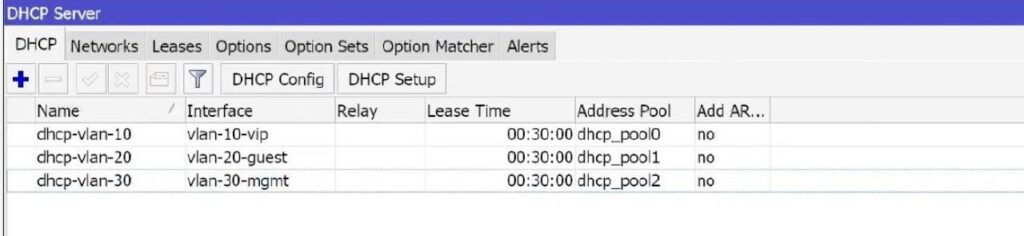
7) Configuring DHCP servers for all VLANs
Why: automatic issuance of the correct IPs to clients on all subnets.
- WinBox: IP → DHCP Server → DHCP Setup:
- Select VLAN10_VIP → Next-OK (change DNS to 172.16.10.1).
- Same for VLAN20_GUEST (DNS 192.168.20.1).
- Same for VLAN30_MGMT (DNS 10.30.30.1).
- WinBox: IP → DNS → enable Allow Remote Requests.
CLI:
/ip pool add name=pool10 ranges=172.16.10.2-172.16.10.254
/ip dhcp-server add name=dhcp10 interface=VLAN10_VIP address-pool=pool10 lease-time=1d
/ip dhcp-server network add address=172.16.10.0.0/24 gateway=172.16.10.1 dns-server=172.16.10.1
/ip pool add name=pool20 ranges=192.168.20.2-192.168.20.254
/ip dhcp-server add name=dhcp20 interface=VLAN20_GUEST address-pool=pool20 lease-time=1d
/ip dhcp-server network add address=192.168.20.0.0/24 gateway=192.168.20.1 dns-server=192.168.20.1
/ip pool add name=pool30 ranges=10.30.30.30.2-10.30.30.30.254
/ip dhcp-server add name=dhcp30 interface=VLAN30_MGMT address-pool=pool33 lease-time=1d
/ip dhcp-server network add address=10.30.30.30.0/24 gateway=10.30.30.30.1 dns-server=10.30.30.1
/ip dns set allow-remote-requests=yes
ResultThe three DHCP servers are active, the leases can be viewed under IP → DHCP Server → Leases.
8) Enabling CAPsMAN (Controller/Manager)
Why: To activate the controller for connecting remote CAP APs.
WiFi → Remote Cap → CapsMan (or Managers) → Enable.
Interface leave 0.0.0.0.0 (listen all) or specify VLAN30_MGMT.
Legacy wireless: Wireless → CAPsMAN → Manager → Enabled: yes.
Ports: open UDP 5246/5247 inside VLAN Mgmt (default OK).
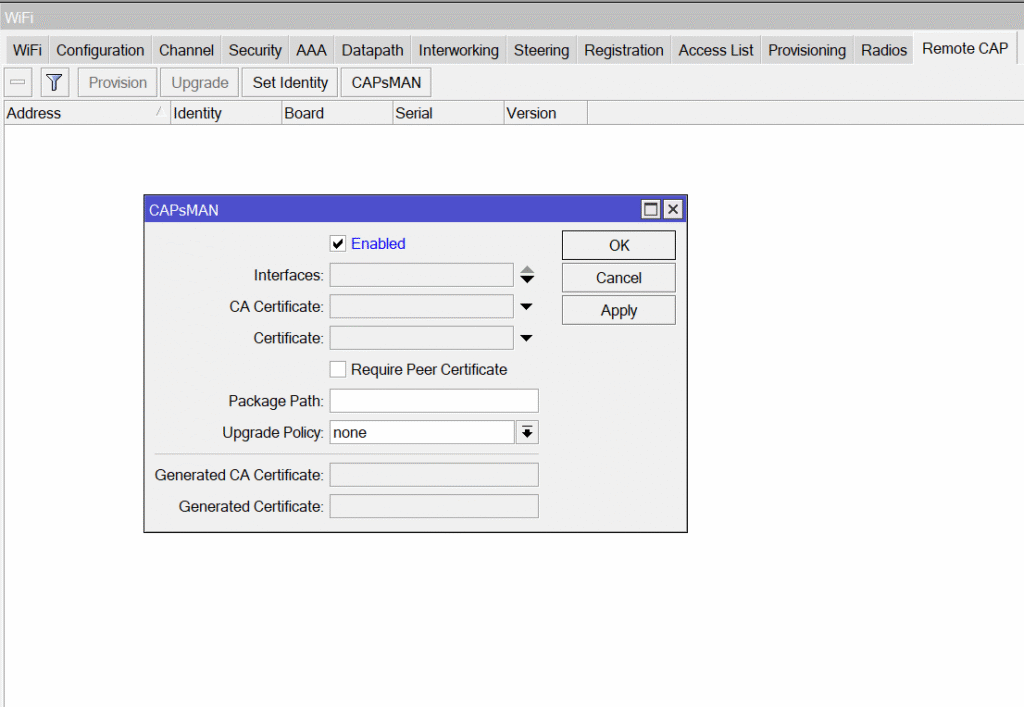
![]() Result: controller is running, waiting for CAP.
Result: controller is running, waiting for CAP.
9) Datapath for SSID (Mikrotik Vlan configuration, VLAN binding)
Why: to determine which VLAN each Wi-Fi network is using.
- WiFi → Datapaths → +:
- Name: dp_VIP, VLAN Mode: use tag, VLAN ID: 10 → OK,
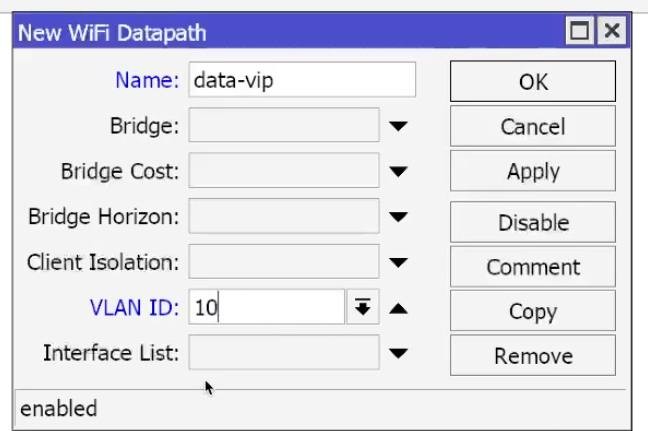
- Name: dp_GUEST, VLAN Mode: use tag, VLAN ID: 20:
- Disable Client-to-Client (or enable Isolate clients) → OK.
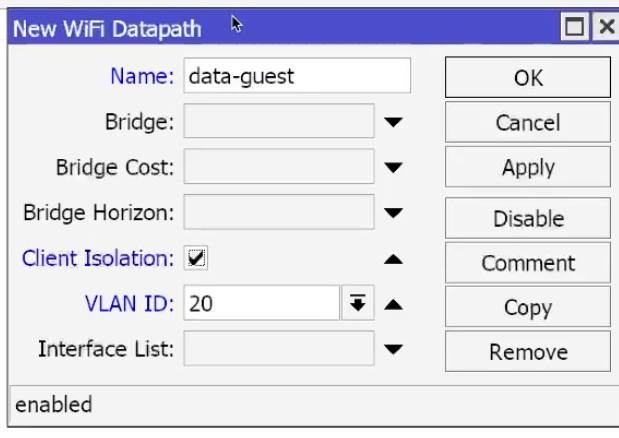
10) Security profiles
Why: Set WPA2/WPA3, keys, Fast Transition for maximum wireless security and correct operation of Mikrotik seamless roaming.
- WiFi → Security Profiles → +:
VIP: WPA2-PSK + WPA3-SAE, Passphrase: 12344321,
It is also necessary to Enable Fast Transition (802.11r) and Over DS, these parameters are responsible for the correct operation of seamless roaming Mikrotik CapsMan, they are located in the FT tab.
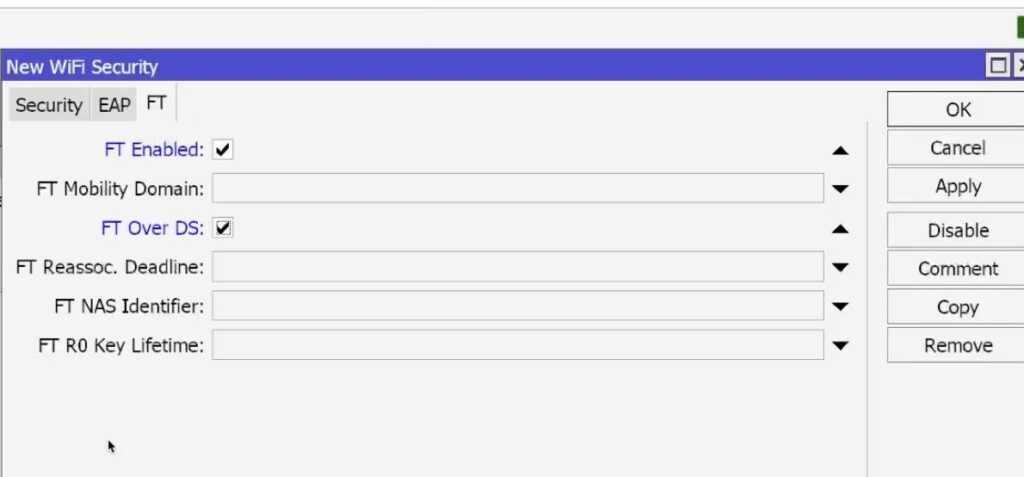
Also by analogy create a second security profile for the guest network which is located on the 20 Vlan CapsMan Mikrotik.
You should end up with something similar to the screenshot below.

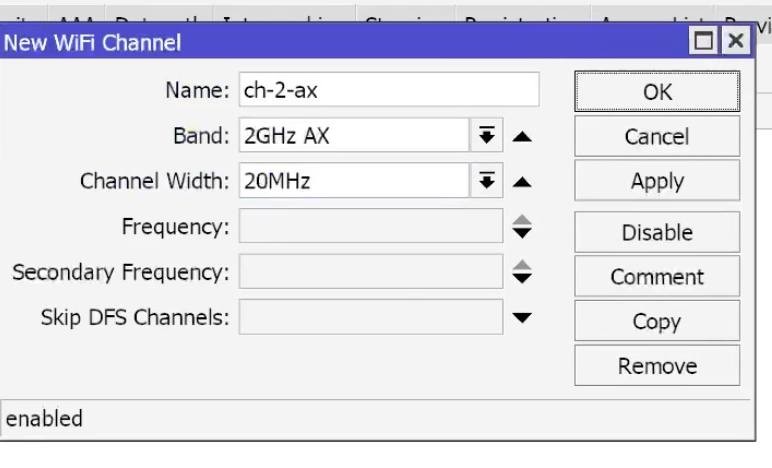
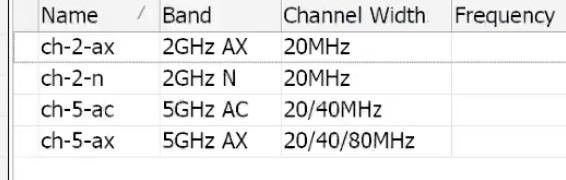
11) Configuring Mikrotik Channel Profiles
Why: Very Important parameter for correct operation of the Mikrotik CapsMan wireless network, channel frequencies/widths for 2.4 and 5 GHz. it is very important to separate correctly.
- WiFi → Channel → +:
Set 2AX_20: Band=2.4GHz-AX, Width=20MHz, Control channels=1/6/11,
For 5 Ghz 5AX_40/80: Band=5GHz-AX, Width=40 or 80MHz, Skip DFS Channels select ALL.
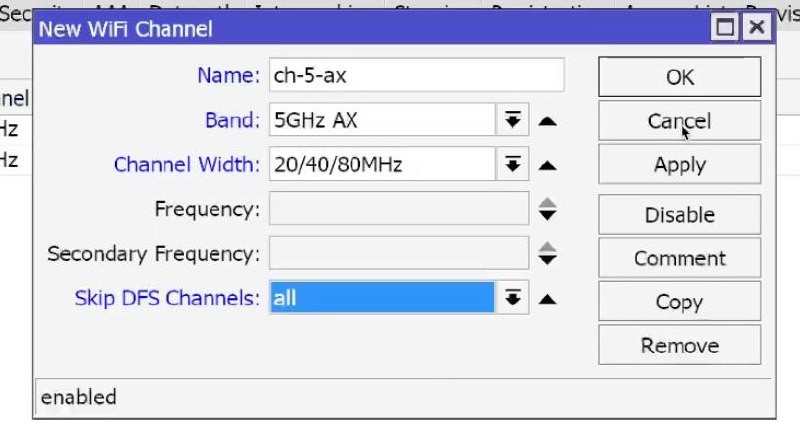
At the start you can skip DFS = all, later return DFS to clear the air but it is not necessary.
If you have equipment with AC standard, similar actions should be performed for it, except Band should be specified AC for 5 Ghz frequency and for 2.4 Ghz should be specified N.
After all the customization, it should go something like this:
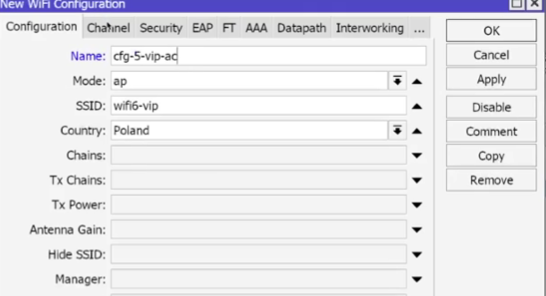
12) Configuring Capsman Vlan Datapath, WiFi Configs for SSID (VIP/Guest × 2.4/5), Configuring Mikrotik Vlan.
Why: separate configs for different bands/groups are needed to separate networks by their own Wlan and also by their own channels. You don’t have to specify a country.
- WiFi → CAPsMAN → Configurations → +:
- 2 VIP AX: SSID: Office_VIP, Channel: 2AX_20, Security: VIP, Datapath: dp_VIP, Mode: AP,
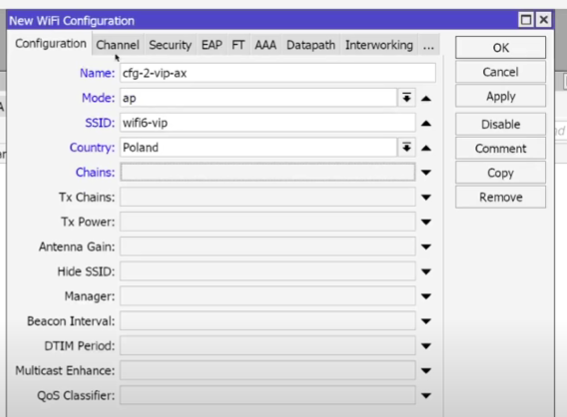
5 VIP AX: similarly, Channel: 5AX as in the first screenshot, only the channel for 5AX should be selected. But for the AC standard it is necessary to select the corresponding AC standard and the channel corresponding to it, which was created earlier.
For the guest network, similar steps need to be performed.
2 GUEST AX: similar, SSID: Office_Guest, Datapath: dp_GUEST,
5 GUEST AX: similarly.

Result: 4+ finished configurations.
14) Local vs CAPsMAN (important): there is no CAPsMAN-forwarding in WiFi (RouterOS 7.0+). There is only Local-forwarding – guest/VIP traffic is processed by the point itself and sent to the corresponding VLAN on the trunk port.
Consequence: on the central controller you do not need to specify bridge in datapath, only VLAN ID. On the AP, the tags will go to trunk.
15) Connecting and Configuring CAP by Vlan:
Why: CapsMan should pass the VLAN as trunk and have control in VLAN30.
- On the remote Cap: Bridge → Bridges → + → Name: BridgeWiFi → OK,
- Bridge → Ports → +:
- Add ether1 (aplink to the controller) to BridgeWiFi and all other ports similarly. Also do not forget to enable VlanFiltering on the bridge.
16) Cap preparation: Configuring Vlan mikrotik, interfaces and VLAN table
Why: Cap should skip the 10/20/30 tags, and the management and management network should receive in VLAN30.
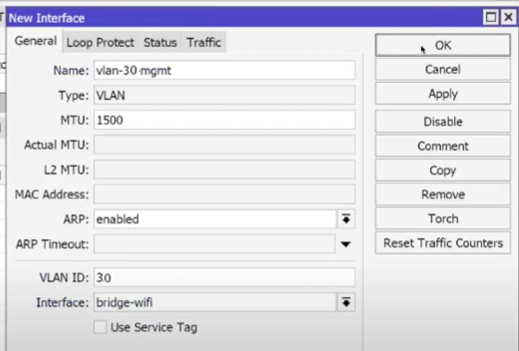
- Interfaces → VLAN → +:
VLAN30_MGMT on BridgeWiFi (ID 30) → OK.
- (VLAN10/VLAN20 on Cap is usually not needed as L3 if there are no local services there. Bridge-vlan rules are sufficient.)
- Go and create Vlan-i accordingly as we have done before
- Bridge → VLANs on Cap:
- VLAN 10, 20, 30:
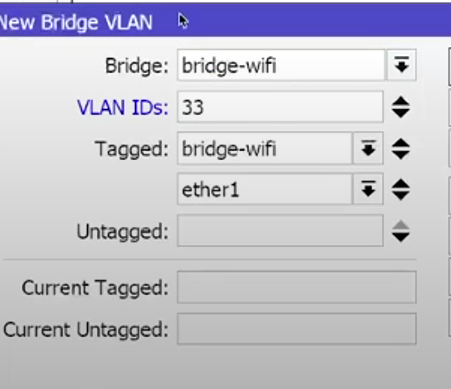
There is a mistake in the screenshot, there should be 30 Vlan IDs instead of 33.
And add the other Vlans by analogy:
- Tagged: BridgeWiFi, ether1 ,
- Untagged: (empty) – Do not change anything here, we have no untagged ports.
Bridge → Bridge: enable VLAN Filtering/Ingress Filtering.
CLI (CAP):
/interface bridge add name=BridgeWiFi
/interface bridge port add bridge=BridgeWiFi interface=ether1
/interface vlan add name=VLAN30_MGMT vlan-id=30 interface=BridgeWiFi
/interface bridge vlan
add bridge=BridgeWiFi vlan-ids=10 tagged=BridgeWiFi,ether1
add bridge=BridgeWiFi vlan-ids=20 tagged=BridgeWiFi,ether1
add bridge=BridgeWiFi vlan-ids=30 tagged=BridgeWiFi,ether1
/interface bridge set BridgeWiFi vlan-filtering=yes ingress-filtering=yes
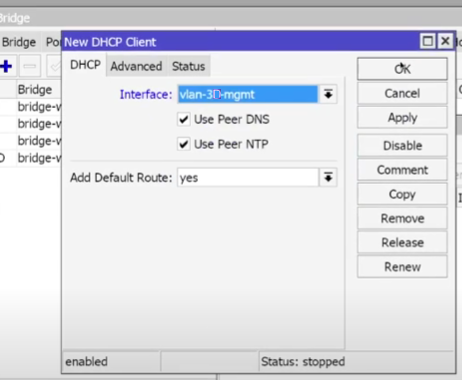
17) DHCP Client on CAP (VLAN30):
Why: so that the CAP can get an IP on the Mgmt VLAN and be able to communicate with the controller.
- IP → DHCP Client → +:
- Interface: VLAN30_MGMT,Use Peer DNS: yes,
- OK.
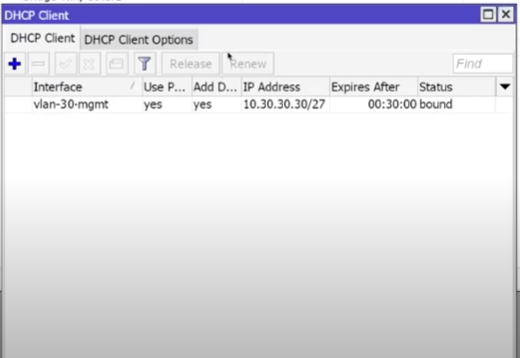
CLI:
/ip dhcp-client add interface=VLAN30_MGMT use-peer-dns=yes disabled=no
- Result: The ATS got an address from the 10.30.30.0/24 subnet, which fully matches our settings (see IP → DHCP Client/Leases on the controller).
Updates, backups, exports
Why: stability and rollback in case of problems.
- System → Packages → Check For Updates → Install (scheduled).
- Files → Backup → Name: vlan_capsman_backup → Backup.
- New Terminal:
- export file=full_config.
- Download the files from Files locally.
Secure access to the router
Why: to minimize the risks of tampering or unauthorized access.
- IP → Services:
- Disable: Telnet, FTP, www (if not needed).
- Restrict WinBox/SSH to (Available From: 10.30.30.0/24).
- System → Users:
- Change the password, create a separate admin user, disable admin (if you still have it).
- IP → Firewall → Address Lists:
- Add the mgmt_allowed list and create a rule to allow management only from it.
Result: management is available only from VLAN30/allowed IPs.
Additional notes / common mistakes:
- Wave2 vs Wireless: Wave2 has different interfaces and menus. If you see only Wireless, it means you have legacy – the logic is similar, but the tab names are different.
- VLAN on CAP: For Local-forwarding, you do not need to raise L3 on VLAN10/20 on CAP. Bridge-vlan (tagged) rules are sufficient. L3 is needed only for VLAN30 (DHCP client).
- DFS: you can skip DFS at the start, but it is better to return DFS channels later to avoid interference/radar.
- PVID/Access port: if you need to give someone an “untagged” VLAN – make it an access port: add the port to the Untagged corresponding VLAN and set this VLAN as PVID in Bridge → Ports.
- Firewall rule order: allow for Mgmt must be higher than drop rules for Guest, otherwise you will disable your control.
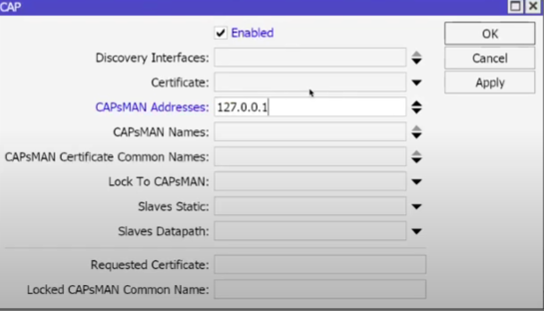
- CAPsMAN Address: if discovery fails – explicitly specify CAPsMAN Addresses to CAP (IP of the controller in VLAN30).
- UDP 5246/5247: If there are firewalls between the controller and the CAP, open these ports.
5 GHz channel width: 80 MHz gives speed but is sensitive to noise; 40 MHz is more stable in “noisy” locations.